Showing posts with label Cakes. Show all posts

Monday, April 23, 2012

Black Forest Cake

Black forest cake is my favorite and its a perfect combination of flavors that melts in your mouth. I've made this cake for my husband's birthday and it was perfect, rich and super simple. 
Ingredients:
Cake:
Chocolate cake mix - 450 gm ( I've used Betty Crocker )
3 eggs
1 1/4 cup water
1/2 cup vegetable oil (I've replaced with 1/4 cup melted butter and 1/4 cup vegetable oil)
1 tsp butter
1 tsp flour
Filling:
1 pint Heavy Whipping cream - 470 ml
1 can pitted sour cherries - 420 gm (drain and reserve the syrup)
1/4 cup granulated sugar
1 dark chocolate bar
10-12 strawberries/cherries for decoration

Directions:
For Cake Preparation:
1. Preheat oven to 350 degrees. Grease the cake pans well with butter and dust it thoroughly with flour (To dust with flour, I dropped a good amount of flour in each pan and shook the flour around until everything was well coated and then shook the excess off).
2. Bake the chocolate cake as directed on the pack by mixing eggs, oil and water together and gently add to the cake mix. (You can prepare chocolate cake from scratch if you have time and patience)
3. Bake it until the cake is done or until a toothpick comes out clean when dipped in middle of the cake. 
4. Take out from oven and let it cool for 10-15 min. Then remove the cake from the pan and cool it completely on cooling rack. 

For Syrup and filling:
5. Refrigerate the bowl and whisk blades, which you'll be using to whip the cream. 
6. Meanwhile take the drained cherry syrup, add 2 tsp of sugar and mix it to dissolve.  
7. Chop the cherries into very small chunks.
8. Take out the chocolate bar from fridge (if kept inside) and keep out for 3 min. Then try to shave it with knife or peeler without touching with hands. 
9. Now take out the bowl and whisk blades from refrigerator. Add whip cream and 1/4 cup sugar in it. Whip the cream on medium speed for 10 min and gradually increase the speed until you see peaks forming. 

For Layering the cake:
10. Take the cake and slice off the uneven top to make a flat surface. 
11. Then slice it horizontally into 1/2 inch thick layers working from out to inside by rotating the cake. 
12. Place a slice on the base and brush it with the cherry-sugar syrup until moist. 
13. Then spread a layer of whip cream, leaving 1/2 inch to the edge and spread the chopped cherries over the cream. 
14. Now moist the second layer with the syrup, place it over and press very gently. 
15. Over the second layer, spread the whip cream and chopped cherries. You can repeat this until how many layers you've got. 
16. Once you are done with top layer, spread the whip cream on top and sides of the cake. Need not be a professional. Make sure the cake is not seen out. 
17. Gently press the chocolate shavings into cream on sides of cake. 
18. Take remaining whip cream into a small Ziploc and cut the corner point. Make your own decorations on top and garnish with strawberries/cherries for a perfect color combination. 

Sunday, November 27, 2011

Mexican wedding cakes


Lets start off with a history on wedding cookies. A wedding cake is an essential element to celebrate and share your joy with others. If the couple has a connection in Mexico or loves Mexican cakes then they can serve them during weddings. Mexican wedding cakes have a very old tradition. They are traditionally prepared with help of butter, vanilla and nuts. These cakes are baked in the form of cookies. The finest quality of butter, vanilla and nuts will give the best quality Mexican cake. These cookies are white in color and served in a multi tier tray after the dinner. This cake has various names and versions. Some people add chocolate to this cake to give flavor.
These cakes became popular in 1950's and 1960's. They are part of all the celebrations like wedding, Christmas, etc. These cakes have roots in the Ancient Arab culture. They traveled to Europe and found variations in Spanish, Russian and Mexican civilization. These cookies are usually round or oval in shape. The variations are mixing fruits, chocolate, food color to the original six ingredients of the cake. The ingredients of this cookies are fine quality butter, vanilla, nuts, salt, powdered sugar and flour. The recipe of this type of cake is simple and easy to make.
Pastelitos de boda (literally,"wedding cookies") are a traditional dessert at Mexican weddings, made with walnuts, pecans, or almonds, they're a sweet way to thank guests for sharing the day.

Mexican Wedding Cakes are a melt-in-your mouth shortbread-like cookie that are also known as Russian Tea Cake, an Italian Butter Nut, a Southern Pecan Butterball, a Snowdrop, a Viennese Sugar Ball and a Snowball. They are very popular, not only at weddings but also during the Christmas season, and other festive occasions. Looking at these cookies you could mistake them for Melting Moments, as the only difference between the two is that Mexican Wedding Cakes contain ground nuts (either ground pecans, hazelnuts, almonds, or walnuts).
The secret to great tasting Mexican Wedding Cakes is to use a high quality butter and pure vanilla extract.


Ingredients : 
2/3 cup nuts (pecans, walnuts, hazelnuts)
1 cup unsalted butter, room temperature
1/4 cup confectioners' (powdered or icing) sugar
1 teaspoon pure vanilla extract
2 cups all-purpose flour
1/4 teaspoon salt

Topping:
1 cup powdered (icing or confectioners) sugar, sifted
Directions : 
1. Preheat oven to 350 degrees F (177 degrees C) and place rack in center of oven.
2. Toast Nuts: Place nuts on a baking sheet and bake for about 8 minutes, or until lightly brown and fragrant. Cool.
3. Once the nuts have cooled completely place them, along with 2 tablespoons of the flour from the recipe, into your food processor, fitted with a metal blade, or a spice grinder and process until they are finely ground (but not a paste). 

4. In a mixing bowl, with a electric mixer, beat the butter and sugar until light and fluffy (about 2 minutes). Beat in the vanilla extract. Add the remaining flour and salt and beat until combined. Stir in the nuts. Cover and refrigerate the dough for about one hour or until firm.  
5. Preheat oven to 350 degrees F (175 degrees C). Line two baking sheets with parchment paper. 
6. Form the chilled dough into 1 inch balls and place them 2 inches apart on the prepared baking sheets. 
7. Bake for about 12 - 15 minutes, or until the edges of the cookies start to brown. Remove from oven and place on a wire rack to cool for about 5 minutes.
8. Meanwhile, place the 1/2 cup sifted confectioners sugar in a bowl. Take the still hot cookies and roll them in the sugar, one at a time. Place on a wire rack to cool. 
9. Let cookies cool 15 minutes, and roll again in remaining sifted confectioners sugar.Or you can simply place the confectioners sugar in a strainer and sift the sugar over the tops of the cookies.
10. Let cool completely before storing. Can be stored in an airtight container for several weeks. Can roll or sift the cookies in more confectioners sugar before serving.
11. Store cookies, putting waxed paper between layers, in tightly sealed container at room temperature up to 1 week or in freezer up to 3 months.


Note : I used pecans, walnuts, hazelnuts but you can use any nuts of your choice.


Monday, April 11, 2011

BM # 4 DAY 7 : Plum Cake ( Classic Christmas Cake)


Ingredients :
1 1/4 cup of all purpose flour
1/3 cup butter
2/3 cup caramel
1 teaspoon baking powder
2 eggs
1 teaspoon vanilla extract
1 cup sugar
a pinch of salt
1 cup mixed dry fruits and nuts(raisins, cashew, dates, tutty fruity, apricot, dry cherry) or can use any dry fruits or even dried welch' dry fruits 
3 tablespoons of all purpose flour
1/4 teaspoon of caraway seeds or shahi jeera,powdered (optional)
1/4 tsp each of ground cinnamon, nutmeg, cloves powder,ginger powder(at least two items)
1/2 cup of Rum(Substitute with juice, keep the cake refrigerated)
1/2 cup red sweet wine
To make Caramel :
1/2 cup sugar
1/2 cup hot water


Directions :
1. Before making the cake,  we have to soak the dry fruit for several hours, overnight or few days ahead, the more number of days, the better. I soaked for 4 days. 
Soak the dry fruits in 2-3 tbsp of rum and 1/2 cup of red wine. Keep this at room temperature. (If you do not want to use alcohol, then read the notes below)
2. Preparing Caramel : 
Spread 1/2 cup of sugar in a thick bottomed pan and heat it. Keep about 1/2 cup of hot water ready on the side. Control the heat when the sugar starts burning. Shake the pan a couple of times, do not stir.
When the sugar starts to turn brown , pour slowly the warm water, 1 tablespoon at a time. Keep ur face away! (caution: it will splitter so be cautious!). Do not burn the caramel or it will make the cake bitter.
The syrup will thicken when it cools down, add water to lighten it. For the cake use the caramel only after cooling down.
3. Preheat oven to 350 degrees F.Grease an 8" round or a square pan. Keep aside.
4. Sift together the flour, baking powder, salt, and all the spices. Keep aside.
5. In a large mixing bowl, add butter and sugar. Beat until creamy and fluffy.
6. Add eggs one at a time, beating well after each addition. Beat in the vanilla extract.
7. Pour in the caramel syrup and mix well.
8. Add the flour spice mixture and mix until the flour is completely incorporated with the wet ingredients.
9. Strain the dried fruits and mix with 3 tablespoons of all purpose flour.
10. Add this to the batter. Also add the nuts at this point. Mix well.
11. Spoon the batter into prepared pan and bake for 40 to 50 minutes(my cake took 1 hr to bake including the extra time) or until a tooth pick inserted into the center of he cake comes out clean plus about 5 minutes. The cake might look burnt because of the extra time but its not.
12. Once cake is cooled, make small pores on cake with tooth pick and pour 1to 2 tbs Rum and  let it soak.(This step is optional)
13. Cover the cake with wax paper and keep it 4 to 5 days or more for a better taste and texture. (This step is optional)
14. Slice the cake only after it cools down completely, else it will crumble.
I did not slice the cake, as i am going to brush the cake with rum and leave it covered for 5 days.
Notes: 
1. You can use orange juice instead of alcohol. Warm the orange juice in microwave and mix the dry fruits and you can also add rum extract(optional) and keep in a air tight container for several hours, overnight or days. If it is soaked for days, try to stir time to time.
2. Since the cake is moistened with rum or juice, bake the cake for 5-8 minutes longer than usual, until the top is dark brown. We prefer to use Captain Morgan spiced rum, any rum should do though.
3. Make sure to use wax paper on the sides and bottom of the pan, caramel make this cakes sticky.
4. Cake will look hard after baking, but wait for couple of days, and wow! it will be much softer and a yummy flavor.
5. The alcohol is evaporated while baking so we can safely feed the kids. Rum is the key flavor , it gives the flavor of the original plum cake we get from the bakery. You can always skip the rum and soak in fruit juice but the flavor is different.


Check out whats cooking in my fellow bloggers kitchen today : 
Diabetes Diet/Management: SrivalliChampaHariniPJ
Kid Friendly Recipes: KalyaniShylajaVeena
Seven Days of Soup:UshaSowmya  
30 Minutes Meals: Priya Suresh  
Seven days of Cakes:  Anusha


BM # 4 DAY 7: Eggless Plum Cake

Ingredients:
2 cups all purpose flour
1 1/2 teaspoon baking powder
1/4 teaspoon baking soda
1 cup mixed dried fruit (dried apricots, figs, cranberries, black and golden raisins, currants, walnuts and cashews)
1 cup brown sugar
1 cup butter(2 sticks)
1 tablespoon golden syrup or maple syrup or date syrup
Finely grated zest from one orange
1 cup water
1 teaspoon baking soda
2 tablespoon yogurt
1 1/2 teaspoon vanilla extract
1/4 teaspoon each ground cinnamon, nutmeg, cloves powder,ginger powder
1 cup smoothly mashed potato


Directions :
1.Grease the base and sides of a deep 8” round cake tin and line the base with parchment paper.
2. In a large bowl, combine the flour, baking powder, baking soda,and all the spices, mix well and sift once to make the mixture uniform.
3. In a medium sized saucepan, combine the dried fruit, sugar, butter, syrup and water and heat slowly on low heat, stirring, until the sugar dissolves. Increase the heat to medium and allow the mixture to come to a boil, reduce the heat and then simmer for 20 minutes on low heat. Remove the sauce pan from the heat, mix in the  1 tsp baking soda and allow to cool.
4. Once the mixture has reached room temperature, stir in the yogurt, vanilla extract, and mashed potato and  beat well with a whisk, until the mixture is smooth. Put in the nuts, and carefully fold in the flour mixture, mixing until well combined.
5. Spoon the cake batter into the prepared tin and smooth the top with the help of a spatula. Cover the cake with aluminium foil and bake at 180 degree centigrade/ 350 degrees F for 1 1/2 to 2 hours or until a skewer inserted in the centre of the cake comes clean.
6. Once the cake is done, allow the cake to cool completely in the tin. When the cake has cooled, place the serving plate over it and turn it upside down. Carefully remove the paper, turn it over again with the help of a plate and serve.
7. If possible, allow the cake to mature over night or atleast for 4 to 5 hours before slicing it up.

Saturday, April 9, 2011

BM # 4 DAY 6 : Coffee Cake


Sitting leisurely in the morning with a slice of Coffee Cake and a steaming cup of coffee, is one of life's little pleasures. This is your classic 'crumb' Coffee Cake recipe. It has a rich and buttery flavor and soft, moist texture. But what makes this Coffee Cake unique is its' streusel topping and its vein of streusel that runs through the center of the cake. The streusel, when baked, becomes slightly crunchy with a grainy texture which contrasts so well to the softness of the cake.
Coffee Cakes are the informal cakes, the ones for everyday. Although called a "Coffee" Cake, it does not usually contain coffee. The name more often refers to how the cake is eaten, that is, with a cup of coffee.
Ingredients :
Coffee Cake Topping:
1/2 cup walnuts
1/2 cup cashews
1/4 cup pecans
1/4 cup light brown sugar
1/3 cup mini chocolate chips
1/4 teaspoon ground cinnamon
1 tablespoon all purpose flour
Coffee Cake:
2 cups sifted cake flour
3/4 teaspoon baking powder
1/2 teaspoon baking soda
1/4 teaspoon salt
10 tablespoons unsalted butter, room temperature
3/4 cup granulated white sugar
2 large eggs
1 teaspoon pure vanilla extract
2/3 cup sour cream or plain yogurt


Directions :
1. Preheat oven to 350 degrees F (177 degrees C) and place rack in center of oven. Place the nuts on a baking sheet and bake for 8 - 10 minutes or until fragrant and lightly browned. Let cool and then coarsely chop. Set aside.
2. Coffee Cake Topping : In a small bowl stir together the sugar, chopped nuts, chocolate chips, ground cinnamon and flour. Set aside.
3. Butter and flour (or spray with a non stick vegetable/flour spray) a 9-inch round or square pan . Line the bottom of the pan with a parchment paper.
4. In a separate bowl whisk together the flour, baking powder, baking soda, and salt. Set aside.
5. In a bowl with an electric mixer, beat the butter until softened (about 1 minute).
6. Gradually add the sugar and continue to beat until light and fluffy (about 3-4 minutes).
7. Add the eggs, one at a time, beating well after each addition. Beat in the vanilla extract.
8. With the mixer on low, add the flour mixture (in three additions) and sour cream (in two additions) alternately, starting and ending with the flour. Mix only until combined.
9. Spoon half of the batter into the prepared pan, smoothing the top with a spatula. Sprinkle about half of the nut topping on top of the batter. Cover with the remaining batter and then sprinkle with the remaining nut topping.
10. Bake for about 40 - 50 minutes, or until a toothpick inserted into the middle of the cake comes out clean.
11. Remove from the oven and let rest for about 10 minutes before releasing the sides of the pan.
12. Serve warm or at room temperature.

Friday, April 8, 2011

BM # 4 DAY 5 : Chiffon cake with Vanilla frosting

Ingredients :
For cake :
1 cup all purpose flour
3/4 cup powdered sugar
2 eggs
1 teaspoon baking powder
1/2 cup oil
1/4 cup freshly squeezed orange juice
1 teaspoon vanilla extract
For frosting :
2 cups heavy whipping cream
1/2 cup granulated sugar
1 teaspoon vanilla extract
3 strawberries, sliced(optional)
chocolate covered strawberries(optional)


Directions :
For Cake :
1. Preheat oven to 325 degree F. Grease a 8" round cake pan. Keep aside.
2. Sift together all purpose flour, baking powder and powdered sugar. Keep aside.
3. Separate egg whites and yolk in two separate bowls.
4. Beat egg whites till you get stiff peaks.
5. Add orange juice, oil  to the yolks and mix well. Do not over beat.
6. To a large mixing bowl, add the yolk mixture. To this gradually add the flour mixture and  mix with a spatula.
7. Now, slowly fold in the egg whites. Do not over beat or the egg whites will go flat.
8. Pour batter into prepared pan and bake for 20 to 30mins or until a toothpick inserted in center of the cake comes out clean.
9. Remove from pan and let the cake cool completely on a wire rack.
For frosting :
1. In a mixing bowl, add whipping cream, sugar, vanilla extract. Stir well. Cover and chill the bowl in refrigerator for atleast 30mins.
2. When chilled, beat the mixture until stiff peaks form.
For frosting the cake :
1. Be sure that the cake(s) are cooled down. If the frosting touches a hot cake, then it may melt. You can either bake 2 cakes and layer them or bake one cake and cut it into two parts.
I baked only one cake so i cut it into two parts. First level the top of the cake with a sharp knife and then cut the cake into 2 equal parts through the center.
2. Carefully remove the cake and place it on a plate. Be sure to dust off any loose crumbs before frosting. If you want a nicer presentation, you may layer wax paper around the edge of the plate before putting the cake on. 
3. Scoop about 1/4 to 1/2 cup of frosting and place it on the center of the cake top.
4. Spread it evenly around the top, rotating the plate as you spread. Use leftover frosting or another scoop to cover the sides. Now spread few sliced strawberries on top and cover them with little frosting again.
5. Place the second layer on top of the bottom layer. Also be sure that there aren't any loose crumbs on this layer.
6. Use 1/2 cup of frosting for spreading on the top.
7. Be sure to cover the sides with any remaining frosting.
8. Dip or wet the knife/spatula in water and shake off any drips.
9. Smooth out the top by spreading the damp utensil across the cake in rows. Dampen it again and go around the sides in a circular motion.
10. Remove the wax paper, if used, or wipe the plate's edge with paper towels to finish.
11. Decorate your cake with sprinkles, icing, and other goodies. I used sprinkles and chocolate covered strawberries.
12. Place the cake in the refrigerator until it's ready to be served.

Note : The cake tastes great even without the frosting.


Check out whats cooking in my fellow bloggers kitchen today : 
Diabetes Diet/Management: SrivalliChampaHariniPJ
Kid Friendly Recipes: KalyaniShylajaVeena
Seven Days of Soup:UshaSowmya  
30 Minutes Meals: Priya Suresh  
Seven days of Cakes:  Anusha


Thursday, April 7, 2011

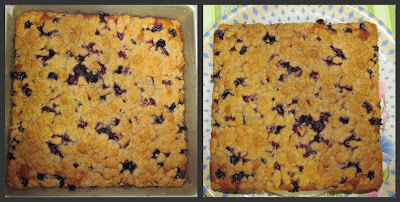
BM # 4 DAY 4: Blueberry Cake

Ingredients :
For Streusel Topping :
1/3  cup(45grams) all purpose flour
1/3 cup (65 grams) granulated white sugar
1/4 cup brown sugar(optional)
1/4 teaspoon ground cinnamon
1/4 cup(56 grams)(4 tablespoons) cold unsalted butter, cut into pieces
For Cake Batter :
1 cup (130 grams) all purpose flour
1 teaspoon baking powder
1/8 teaspoon salt
1/4 cup (56 grams)(4 tablespoons) unsalted butter, room temperature
1/2 cup(100 grams) granulated white sugar
1 large egg
1/2 teaspoon vanilla extract
1/3 cup (80 ml) milk
2 cups fresh blue berries


Directions :
1. Preheat oven to 350 degrees F (177 degrees C). Butter, or spray with a nonstick vegetable spray, an 8 x 8 inch (20 x 20 cm) square pan or an 8 inch (20 cm) round cake pan.
2. For streusel topping: In a large bowl, mix together the flour, white sugar, brown sugar and ground cinnamon. 
Add in the butter and mix the butter using your hands until the mixture resembles coarse crumbs. Set aside while you make the cake batter.
3. For the cake batter: In a separate bowl sift together the flour, baking powder, and salt. Set aside.
4. In another bowl, add the butter and beat until smooth. Add the sugar and beat until light and fluffy.
5. Add the egg and vanilla extract and beat until incorporated.
6.  Add the flour mixture, alternately with the milk, and beat only until combined.
7.  Spread the batter onto the bottom of the prepared pan, smoothing the top with a spatula. 
8. Evenly arrange the blueberries on top of the cake batter and then sprinkle with the streusel topping.
9. Bake for about 40 - 50 minutes or until a toothpick inserted in the center of the cake comes out clean. Remove from oven and place on a wire rack to cool slightly. 
10. Serve warm or at room temperature.
Note : You can also make this cake with other berries and fruits that are in season. Raspberries and blackberries are especially nice, and during the fall and winter months it is excellent with sliced apples, plums or even pears. Just use enough sliced fruit to cover the entire surface of the cake batter and then top with the streusel mixture.

Check out whats cooking in my fellow bloggers kitchen today : 
Diabetes Diet/Management: SrivalliChampaHariniPJ
Kid Friendly Recipes: KalyaniShylajaVeena
Seven Days of Soup:UshaSowmya  
30 Minutes Meals: Priya Suresh  
Seven days of Cakes:  Anusha


Wednesday, April 6, 2011

BM # 4 DAY 3 : Easy Eggless Cake

I have noticed that most of my fellow bloggers in BM do not use eggs, so i thought of baking an eggless cake today. I got this recipe from my friend Usha. Thanks to her for this wonderful recipe.
I also wanted to share a link which has a very good recipe for diabetic carrot cake. I did not have all the ingredients to try this cake so i thought of sharing the link.
http://www.amandascookin.com/2009/08/carrot-cake-towers-diabetic-friendly.html


Ingredients :
2 cups all purpose flour
1 cup powdered sugar
1 cup sweetened condensed milk
1/2 teaspoon baking soda
1 1/2 teaspoon baking powder
200 ml carbonated orange drink (i used fanta)
7 tablespoons butter(100 gms)
1/2 teaspoon vanilla extract(optional)


Directions :
1. Preheat the oven to 350 degree F. Grease two 8" round cake pans and keep aside.
2. Sift together all purpose flour,baking soda and baking powder, keep aside.
3. In a mixing bowl, add butter, powdered sugar, condensed milk and beat until its creamy(for 5mins approx.).
4. To the butter mixture add carbonated orange drink. Do not over beat.
5. Gradually add the flour mixture and mix well until smooth.
6. Add the vanilla extract and give it a final mix.
7. Pour the batter into prepared pans and bake for 35 to 40mins (for me it took exactly 35 mins) or until a toothpick inserted into the center comes out clean.
8. Let the cake cool in the pan for 10mins and then transfer to a wire rack and let it cool completely before serving.
Check out whats cooking in my fellow bloggers kitchen today : 


Diabetes Diet/Management: SrivalliChampaHariniPJ
Kid Friendly Recipes: KalyaniShylajaVeena
Seven Days of Soup:UshaSowmya  
30 Minutes Meals: Priya Suresh  
Seven days of Cakes:  Anusha